Grow a Holiday Microgreens Centerpiece: The 10-Day Edible Decor Guide
December 10, 2025 • Micro-Gardening & Food Production
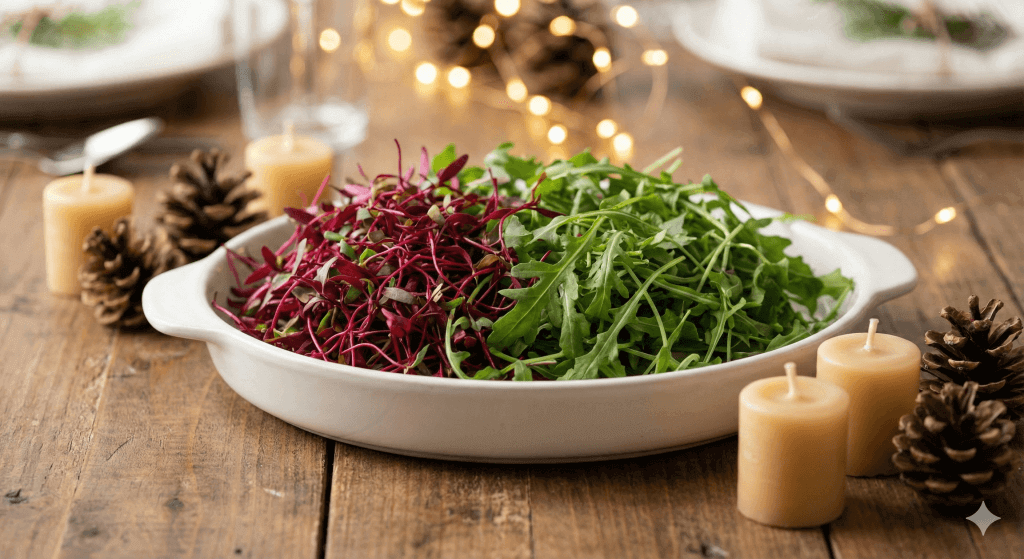
Fresh, festive, and ready to eat: The ultimate zero-waste holiday decoration.
It happens every year. The calendar flips to mid-December, and suddenly you realize you haven’t decorated, you don’t have space for big displays, and you definitely don’t want to buy cheap plastic tinsel that will end up in a landfill.
If you loved our guide on the DIY Rosemary Christmas Tree but worried you didn’t have enough time to shape a topiary, we have the perfect solution.
Meet the holiday microgreens centerpiece.
It is the fastest, freshest way to bring the “Red and Green” holiday spirit into a small apartment. Best of all? It takes only 10 days from seed to table, meaning if you start now, you will have a lush, living decoration ready for your holiday dinner.
Why Microgreens are the Perfect Holiday Hack
For the uninitiated, microgreens are simply vegetable greens harvested just after the cotyledon leaves have developed. They are a staple of SmallEcoSpace living because:
- Speed: Most varieties are ready to harvest in 7 to 14 days.
- Density: You can grow hundreds of plants in a container the size of a dinner plate.
- Flavor: They are flavor bombs—up to 40 times more nutrient-dense than mature plants.
- Aesthetics: They look like tiny, vibrant forests.
The Palette: Choosing Your “Red & Green” Seeds
To create a true holiday microgreens centerpiece, we need to curate our seeds by color. You can find these seeds at any garden center or health food store.
The Reds (The Festive Pop)
These varieties have stunning red stems or leaves that contrast beautifully against the green.
- Red Amaranth: The king of red microgreens. It has vibrant, neon-pink/red stems and leaves.
- Bull’s Blood Beets: Deep, earthy crimson leaves. (Note: These take a few days longer, about 12-14 days).
- Red Stem Radish: A spicy kick with purple/red stems. Fast grower!
The Greens (The Forest Floor)
These provide the lush, snowy-forest look.
- Arugula: Fast-growing with a peppery bite.
- Broccoli: Mild flavor, grows very thick and fast.
- Kale: Hearty and beautiful dark green leaves.
Step-by-Step: Growing Your Centerpiece
You don’t need fancy grow lights or hydroponic equipment for this. Since we are harvesting quickly, a sunny windowsill is enough.
1. Upcycle Your Container
Forget the ugly black plastic nursery trays. Since this is a holiday microgreens centerpiece, the container matters. Look for:
- A shallow white ceramic baking dish.
- A glass pie pan.
- A wide soup bowl or a thrifted tea saucer.
Note: If your container doesn’t have drainage holes, just be careful not to overwater. Misting is your friend here.
2. The Soil Bed
Fill your container with about 1 inch of organic potting soil or coconut coir. Flatten it gently with your hand so it is level. A level surface ensures your “forest” grows at the same height.
3. The Seeding Design
This is where you get artistic! You can mix the red and green seeds together for a “confetti” look, or get creative:
- The Stripe: Plant a thick strip of Red Amaranth down the middle, flanked by green Broccoli on either side.
- The Bullseye: Plant red seeds in a circle in the center, surrounded by green.
Sow the seeds densely. You want them almost touching, like poppy seeds on a bagel. Press them gently into the soil and mist heavily with water.
4. The Blackout Period (Days 1-3)
Cover your container with a dinner plate, a piece of cardboard, or a dark towel. This “blackout” period mimics being underground and forces the stems to stretch and grow strong. Keep the soil moist by misting once a day.
5. Into the Light (Days 4-10)
Remove the cover. Your plants might look yellow—that is normal! Move them to your brightest windowsill. Within 24 hours, photosynthesis will kick in, and they will turn a vibrant green (and red).
Styling Your Sustainable Table
By day 10, you should have a dense, 2-3 inch tall forest of greens. Now, style it for the big dinner.
Place your container in the center of the table. Nest it among natural elements like pinecones, unbleached beeswax candles, or even some trimmings from your Rosemary Tree.
The Zero-Waste Harvest: The best part? When dinner is served, give your guests a pair of scissors. Let them “harvest” their own garnish directly from the centerpiece onto their potatoes or soup. It’s an interactive, conversation-starting experience that highlights the beauty of urban food production.
Conclusion
Small space living doesn’t mean skipping the holidays. It means celebrating them more thoughtfully. This holiday microgreens centerpiece proves that you can grow beauty and food simultaneously, with zero plastic and zero waste.
Time to Start Your Own SmallEcoSpace Cycle
You don’t need acres of land to make a difference. By implementing a simple balcony composting system, you’re not just reducing trash—you’re enriching your own tiny planet.
Start small, stick to the Green-Brown balance, and you’ll be harvesting your first batch of homemade fertilizer in a matter of weeks!